Unlocking Spinal Balance: A Gold-Standard Approach to Scoliosis Rehabilitation (Right Convexity
Scoliosis, a complex three-dimensional spinal curvature, can significantly impact posture, comfort, and overall well-being. If you or a loved one are navigating the journey of scoliosis, particularly with a right-sided convexity (meaning the curve bulges out to the right, often in the thoracic spine), understanding effective rehabilitation strategies is key.
In this post, we’ll delve into the gold standards of scoliosis treatment, focusing on the Schroth Method and Scientific Exercises Approach to Scoliosis (SEAS). These evidence-based approaches are designed to counteract the specific forces at play in your spine, promoting better alignment and functional strength.
Understanding Your Curve: Right Convexity, Left Concavity
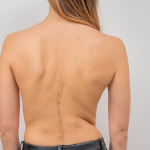
With a right-sided convexity, your spine curves to the right, often leading to a visible prominence of the ribs on that side (known as Rib Cage Prominence, or RBS). Conversely, the left side of your spine will exhibit a concavity – an area where muscles may become shortened and compressed. Our rehabilitation goals revolve around addressing both of these aspects:
- Lengthening and expanding the concave (left) side.
- Strengthening and de-rotating the convex (right) side.
The Core Principles of Scoliosis Rehabilitation
The most effective scoliosis rehabilitation programs share several key objectives:
- Auto-Correction: Learning to actively reduce the curve through precise 3D postural adjustments.
- Rotational Breathing: Utilizing specific breathing techniques to expand the compressed areas of the rib cage and mobilize the spine.
- Stabilization: Building core strength to maintain corrected posture during daily activities and prevent further progression.
Your Exercise Protocol: A Step-by-Step Guide
Before diving into specific exercises, it’s crucial to establish a foundational “auto-correction.” This is your baseline posture that you’ll strive to maintain throughout the exercises.
Phase I: Mirror-Assisted Auto-Correction
Imagine your spine as a flexible rod that you’re gently guiding back to a straighter path.
- Pelvic Shift: If your pelvis tends to sway to one side, gently shift it towards your convexity (right side) to help level your hips (Anterior Superior Iliac Spines – ASIS).
- Thoracic Shift: Gently shift your upper trunk (rib cage) towards your concavity (left side). This helps to “center” your torso over your pelvis.
- Elongation: Visualize a gentle, upward pull from the crown of your head, lengthening your spine as if growing taller. This creates essential space between your vertebrae.
Phase II: Specific Corrective Exercises
Once you’ve found your auto-corrected posture, you can integrate these targeted exercises.
- The Muscle Cylinder (Convexity Strengthening)
- Focus: Strengthening the overstretched muscles on your convex (right) side.
- Execution: Lie on your right side (convex side down) on a mat. Place a firmly rolled towel or small bolster just under the apex of your spinal curve. Gently lift your upper trunk and/or legs slightly, engaging the muscles on your right side to create a gentle counter-pressure against the towel. Hold for 20-30 seconds, repeat 3-5 times.
- Concave Expansion
- Focus: Mobilizing and expanding the compressed tissues and ribs on your concave (left) side.
- Execution: Kneel on a mat with one hand on the floor for support. Gently lean your torso towards your right side, reaching your left arm overhead. As you do this, take a deep breath, consciously directing the air into your left lung, feeling the expansion in your left rib cage. Hold the stretch and breath for 5-10 seconds, repeat 5-8 times.
- Doorway Stretch
- Focus: Releasing tension in the pectoral muscles, which can become tight and contribute to rotational imbalances, especially on the convex side.
- Execution: Stand in a doorway, placing your forearms on the doorframe with elbows bent at 90 degrees. Step forward gently with one foot until you feel a stretch across your chest. Focus on retracting your right shoulder blade (pulling it back and down) to enhance the stretch and encourage better postural alignment. Hold for 30 seconds, repeat 3 times.
- Side Plank (Modified)
- Focus: Building lateral stability and strengthening the muscles that help to “lift” and de-rotate the convex side.
- Execution: Perform a side plank on your left side (concave side down). Support yourself on your left forearm and the side of your left foot, keeping your body in a straight line. This position forces the muscles on your right (convex) side to work harder to maintain alignment against gravity. Hold for 20-30 seconds, repeat 3 times.
The Power of Rotational Breathing (RAB)
The Schroth Method’s Rotational Angular Breathing (RAB) is a cornerstone technique for addressing the rotational component of scoliosis.
- Position: Perform while seated or standing in your auto-corrected posture.
- Technique: Place your hand on your left posterior (back) ribs. As you inhale, consciously direct your breath into the “flat” or compressed areas – specifically the left posterior ribs and the right anterior (front) chest. Feel your left back ribs gently push against your hand during inspiration. This helps to expand the collapsed areas and mobilize the rib cage.
Important Considerations and Precautions
- Avoid Hypermobility: Be cautious with deep spinal twists or extreme backbends (like a full Cobra pose) without specific guidance, as these can sometimes exacerbate rotational deformities.
- Listen to Your Body: If you experience any sharp pain, numbness, or tingling in your lower extremities (radicular pain or paresthesia), stop the exercise immediately and consult with a healthcare professional.
- Professional Guidance: While these exercises are based on gold standards, they are general recommendations. A formal physical therapy evaluation with a Schroth-certified therapist is highly recommended. They can create a personalized plan tailored to your specific curve pattern, apex of the curve, and degree of rotation.
- Monitoring Progress: Regular monitoring with a scoliometer and periodic X-rays to track your Cobb angle is essential to assess progress and adjust your program as needed.
Conclusion
Managing scoliosis is a journey that benefits immensely from targeted, evidence-based exercises. By consistently applying the principles of auto-correction, specific strengthening, and rotational breathing, you can work towards improving your spinal alignment, reducing discomfort, and enhancing your quality of life. Remember, consistency and proper technique are your greatest allies in this process.
References
- Weiss, H. R., & Moramarco, M. (2013). The Rigo Classification: a basis for the Schroth method’s three-dimensional scoliosis treatment. Scoliosis and Spinal Disorders, 8(1), 19.
- Negrini, S., Donzelli, S., Aulisa, A. G., Czaprowski, D., Schreiber, S., de Mauroy, J. C., … & Zaina, F. (2018). 2016 SOSORT guidelines: orthopaedic and rehabilitation treatment of idiopathic scoliosis during growth. Scoliosis and Spinal Disorders, 13(1), 3.
- Lehnert-Schroth, C. (2007). Three-dimensional treatment for scoliosis: A practical guide to physiotherapy. The Liel Verlag.